1 | Hardware & Systems
Website Domain & Email Guide
Domain name:
- New Flowte Franchisee's should begin by registering the local Flowte domain for their territory.
- For example the local domain for Spain is Flowte.es
- Use Google Domains https://domains.google/ or Hover https://www.hover.com/ for domain registration
- After purchase, apply a redirect from the domain to the official Flowte website at www.flowte.com
Email Set Up:
- Flowte recommends using Google Gmail as your email client.
- Once your domain is registered you can as many unique email addresses as you need
Required Software for Flowte Franchisee's
Zoho Desk | https://www.zoho.com/desk/ | Used for Support
Slack | https://slack.com/ | Used for internal team communication
Zoom | https://zoom.us/ | Used for sales and Support
Hardware Buying Guide
Scanning Devices:
Flowte allows you to add a barcode or QR code to every type of ticket in the system. Once a barcode has been added the tickets can then be scanned in quickly and easily using the Flowte Scanning App for IOS. For your scanning devices we recommend using iPod touches. You can find a range of iPod touches on the Apple website. Below is a link to purchase.We also recommend buying fast charging docks from Amazon UK. This will allow you to store and recharge all of the scanners securely and simultaneously!(https://www.amazon.co.uk/dp/B07G74MZHJ/ref=cm_sw_r_cp_api_i_vetpFbY2TBRMN)
Turnstiles
A turnstile makes it possible to control entry and exit into and out of a specific location in your venue. A traditional turnstile consists of a set of 3 arms that extend horizontally from a post to act as a barrier to entry. These arms rotate to allow entry or lock to restrict access. A turnstile can provide security, organize crowds, prevent losses from theft, and control access.
For more information on turnstiles visit our help guide.
Printers
Selecting the right ticket printers is important. The printer that works best with Flowte is the Stimare CLS 500 thermal ticket printer ( in white). You can buy these directly from Stimare. Flowte's point of contact Stimare is Brian Dunphy. By referencing you are a Flowte client you are able to purchase the printers at a discounted price. Their contact info and product info for the cls unit is available here:
Ticket stock and plastic card stock
Please follow our dedicated guide at this link which gives specifications and supply partner details for both thermal ticket stock and plastic card stock
Card Printers
A card printer is an electronic desktop printer with single card feeders which print and personalize plastic cards. These are great for season tickets and packages. Below is a link to the Zebra website where you can purchase the right card printer for your organisation. The model we recommend is the Zebra ZC 11. Our official partner for these printers is the Barcode Warehouse in the UK and Barcodes Inc in the USA
EMV / Chip and Pin Card Terminals
These units are supplied directly by Flowte. Your account manager will organise quantities and delivery directly
All in One PC | We recommend ordering an all in one PC rather then a laptop or regular desktop PC for any station that will be selling tickets. These can be ordered locally but should meet with the specifcation set out in our PC configuration guide here: https://help.flowte.com/portal/en/kb/articles/flowte-pc-config
Configure PC's & Network

Minimum Specification
All-in-One Desktop PC
RAM - 16GB
Intel processor 7th Generation or newer
Windows 10 (2020 H2 Update minimum)
32GB Hard Drive (SSD recommended)
WiFi receiver - AC Dual band (2.4/5Ghz)
3 x USB Ports
Google Chrome
Wireless Keyboard & Mouse
STEP 1 | Run Windows Refresh
Microsoft's Refresh Windows 10 tool can rid your PC of junk-ware & return it to a pristine state.
One of the problems of buying a new PC is that it typically comes loaded with junk-ware—usually trial or limited pieces of software that you don't want or don't need but all of which will slow down the performance of Flowte. That same software can slow down your computer and chew up memory.
You can try to uninstall each piece of junkware to clean up your PC. But that takes time and can still leave files, Registry entries, and other unwanted stuff behind. Instead, you should return your Windows 10 computer to a pristine state via a free software tool offered by Microsoft.
Microsoft's Refresh Windows tool purges all applications that don't come built into Windows 10 by installing a fresh copy of the operating system.
To access this tool in Windows 10, click on the Start button > Settings > the category for Update & security. From the Update & security window, click on the setting in the left pane for Recovery. Then click on the link in the right pane under "More recovery options" that reads: Learn how to start fresh with a clean installation of Windows.
That link brings you to a webpage with information on the Refresh Windows tool along with a button for downloading it.
On this screen you can choose “keep your personal files” or “nothing” Choose “nothing” & click start
Windows 10 will download and install from scratch. Take a coffee break as this process takes time.
Finally, Windows delivers you to the Lock screen & then the sign-in screen. Log in as normal.
After setup completes, you'll see that Windows 10 has reverted to a clean state with no junkware.
STEP 2 | Optimise Windows for Flowte
1. Restart your PC daily.
While this may seem an obvious, many users keep their machines running for weeks at a time. Over time this will slow down your computer. You can fix this issue by shutting down your PC each day once you have finished using it, by clicking on the Windows button and selecting the 'Power' button.
2. Check startup apps
PCs speed can be slowed down by the sheer number of running processes. Many installers will instruct Windows to run their programs immediately after you log in
To check start-up programs, open Task Manager (Ctrl + Alt + Del), then click the 'Start-up' tab. Pay attention to the 'High Start-up Impact' programs. Then right-click on each and choose 'Disable'.
3. Run Disk Cleanup
Disk Cleanup is an extraordinarily built-in Windows utility. You can use it to clear out temporary files which accumulate on your machine, such as image thumbnails and offline webpages.
Click the Windows menu and type 'Disk Cleanup' in the search bar to get started. The utility will offer you a choice of files to remove. Simply mark the check box next to each option. Click 'Clean up system Files' to begin. Disk Cleanup will calculate the amount of space you will save.
This is also a good opportunity to delete any files on your hard drive which you no longer need. An easy place to start is your 'Downloads' folder.
4. Disable special effects
Windows 10 is rather heavy on the resource-intensive special effects side. To take your PC back to basics, open the Windows menu and search for 'System', then go to 'Advanced Settings' tab and select 'Performance Settings'.
Under the 'Visual Effects' tab, click the radio button for 'Custom'. From here, you can uncheck the tick boxes next to any visual affects you want to disable. Click 'Apply' to confirm your changes.
5. Disable transparency effects
Windows 10 also employs surprisingly resource intensive transparency effects for certain features.
To disable transparency effects, open the Windows menu and type 'Make Start, taskbar and Action Centre transparent'. This will pull up the 'Colour' Settings. From here switch off transparency.
You can also change the default app mode here between 'Light' and 'Dark'. This won't affect your system speed, but may make your Desktop easier on the eye.
6. Managing updates.
Click Start > Control Panel > System and Security. Under Windows Update > "Turn automatic updating on or off" link. Click the "Change Settings" link on the left. Verify that you have Important Updates set to "Never check for updates (not recommended)" and click OK.
7. Remove the log in screen
>Click the Windows 10 Start Menu and type Netplwiz.
>Select the program that appears with the same name.
>Uncheck the box labelled “Users must enter a username and password to use this computer.”
> Click Apply it will prompt you for your current password. Enter it twice and you’re finished.
>The next time you reboot you’ll no longer need to type in your password.
STEP 3 | Customise Windows 10 Desktop
1. Eliminate the start menu:
2. Install the Flowte Background.
Select the Start> Settings > Personalization> Background > Choose picture and apply the image located here: https://i0.wp.com/flowtesport.com/wp-content/uploads/2019/02/Header-sports-stadium-ticketing-system-blog-article-2.png?fit=1000%2C500&ssl=1
STEP 4 Install and customise Google Chrome for Flowte
1. Install Google Chrome and make it the default browser.
2. Pin Chrome to the taskbar
Right-click Chrome, and then select More > Pin to taskbar.
3: Update Chrome
Chrome works best when you're on the latest version.
4: Close unused tabs
5. Allow Pop Ups:
Click the Chrome >Settings> advanced settings >in the "Privacy" section> Content settings
In the "Pop-ups" section, select "Allow all sites to show pop-ups."
6: Turn off or stop unwanted processes.
Delete all extensions & stop unwanted tasks
7. Make Flowte the homepage.
Open Chrome > Settings > check the box labeled "Show Home button"> click "Change"
Change the address to https://www.flowte.me/login/?
8: Turn on "page prefetch" to make webpages faster.
Open Chrome > More Settings > Advanced > In the "Privacy and security" section, turn on “Use a prediction service to load pages more quickly”
9: Reset Settings
Open Chrome > More Settings >Advanced Under “Reset settings” click “Restore settings to their original defaults
STEP 5 | Install the correct printer drivers.
Follow this knowledge base article: https://help.flowte.com/portal/en/kb/articles/managing-hardware#Thermal_Ticket_Printers
Thermal Ticket Printers
Get Ready for Printing
Flowte utilises HTML for printing and you can print from Flowte to any printer.
In order to print you must use a Windows PC with Google Chrome as the browser. Other browsers or devices are not recommended or supported.
In order to enable printing step 1 and step 2 below *must* be configured
Step 1: Configure your PC
Set ticket size
In MS Windows > Devices & Printers confirm your ticket size is set correctly:
1 | Select your printer
2 | Select print server properties
3 | Select your ticket form and confirm your width and height match exactly your physical ticket stock and the Flowte ticket design dimensions. You can adjust your settings and save your form in this screen. In this example I named my form Flowte, with ticket dimensions of 7.62cm x 13.97 cm.
For Windows 10 Machines:
Control panel > Devices and Printers > Printer server properties > Create new form.
1. Right click the printer > printer properties.
2. Select your ticket form and confirm your width and height match exactly your physical ticket stock and the Flowte ticket design dimensions. You can adjust your settings and save your form in this screen. In this example I named my form Flowte, with ticket dimensions of 7.62cm x 13.97 cm.
Set Notch Distance (Stimare printers only)
If you are using a Stimare printer you will need to set the notch distance on your Stimare printer.
1 | Enable the Mass Storage flash drive -
Press and hold the 3 red buttons – LF + FF + S1 whilst switching on your printer. After 5-10 seconds, the machine will make a beep and restart in Mass Storage mode.
2 | From your external drive list in File Explorer > Open Mass Storage and then open Setup.ini using Notepad
3 | Find the setting for Notch Distance [mm]
4 | After the = sign enter the shortest distance between the edge of your ticket stock and the black notch marker in mm, this must be prefixed with a + e.g. +30
5 | Save and exit the file
6 | Restart the printer
Confirm print settings
Once you print your tickets in Flowte you are presented with your print dialog box:
1 | Confirm your ticket printer is selected
2 | Confirm your paper size is set to your form Referenced above in Section A, in my example Flowte
3 | Confirm your scale is set to 100
4 | Print your tickets
Should you have any issues with ticket printing please contact Flowte Support via our in app support channel!
Background colours: If you plan to use background colours in your HTML template each user will need to enable "print background colours" in their local printer settings. We recommend against using background colours as this involves local printer settings as per this sample screenshot.
Troubleshooting
If your tickets are printing upside down you will need to go to printer settings > advanced > change Print Rotation to "180 Degrees"
If your tickets are printing sideways make sure your layout is set to "Landscape"
If your new form doesn't show in the paper list of your printer, swap the Width and Height values on your form and recheck
If your printer isn't cutting tickets in right location try the following:
- rotate your ticket stock so it is feeding into the printer the opposite direction
- on the flash drive edit the setup file, find "Notch Distance [mm]" and set the value to the mm between edge of ticket and black notch on your ticket stock
How to add templates for Tickets Navigate to Ticketing > Tickets. You can choose to add either a printed ticket design, for tickets printed in the box office; or an E-Ticket design, for tickets sent by email.
Step 2: Ticket Designs in Flowte
How to add templates for Tickets Navigate to Ticketing > Tickets. You can choose to add either a printed ticket design, for tickets printed in the box office; or an E-Ticket design, for tickets sent by email.
To add a Ticket Design Click 'Add Ticket Design' in the top right corner. You will be presented with the following page.
Here you have options to set the size of the design and add any of the available tags to ticket designs.

It is essential that the size of your tickets is an exact match to your actual design.
Failure to match these two together will result in blank tickets being printed or blank space being printed
To add a tag click on the dropdown menu 'Choose Tag', select the tag you wish to place on your ticket design and click 'Add Tag'.
The tags have been grouped together into their relevant sections; values relevant to Tickets are grouped together, relevant to receipts are grouped together, etc.
The tag will appear on your ticket design, click and drag the tag to the desired location, you may then select another tag from the menu until the ticket is complete.
Clicking on a tag will give you the option to change Font / Font Size and give you the ability to add Custom Text.
Clicking on a tag will give you the option to change Font / Font Size and give you the ability to add Custom Text.
At any time you can click 'Preview Ticket' to see a print preview of the ticket design as it will appear.
Adding Custom Images
Navigate to Ticketing > Tickets
Click "Add Ticket Design". The following box will appear:
Select Choose Tag > Custom Image
Click the tag [custom_image]. The following options will appear:
In the Image URL section, add the image URL you will like to add into your ticket design.
You can also adjust the Height and Width of the image as you please.
The image will appear on your ticket design, click and drag the image to the desired location, you may then select another image by clicking the Add Tag button.
Once you are happy with the ticket. Click Save ticket.
To add a Ticket Design Click 'Add Ticket Design' in the top right corner. You will be presented with the following page.
Here you have options to set the size of the design and add any of the available tags to ticket designs.
It is essential that the size of your tickets is an exact match to your actual design.
Failure to match these two together will result in blank tickets being printed or blank space being printed
To add a tag click on the dropdown menu 'Choose Tag', select the tag you wish to place on your ticket design and click 'Add Tag'.
The tags have been grouped together into their relevant sections; values relevant to Tickets are grouped together, relevant to receipts are grouped together, etc.
The tag will appear on your ticket design, click and drag the tag to the desired location, you may then select another tag from the menu until the ticket is complete.
Clicking on a tag will give you the option to change Font / Font Size and give you the ability to add Custom Text.
Clicking on a tag will give you the option to change Font / Font Size and give you the ability to add Custom Text.
At any time you can click 'Preview Ticket' to see a print preview of the ticket design as it will appear.
Adding Custom Images
Navigate to Ticketing > Tickets
Click "Add Ticket Design". The following box will appear:
Select Choose Tag > Custom Image
Click the tag [custom_image]. The following options will appear:
In the Image URL section, add the image URL you will like to add into your ticket design.
You can also adjust the Height and Width of the image as you please.
The image will appear on your ticket design, click and drag the image to the desired location, you may then select another image by clicking the Add Tag button.
Once you are happy with the ticket. Click Save ticket.
Ticket & Card Stock
Flowte Sport work with three official partners to supply thermal ticket paper and thermal wristband stock for use with our range of thermal ticket printers as follows:
1. Stimare (UK thermal tickets only) (Stimare.net)
2. Weldon Williams and Lick (USA thermal tickets only) (wwlinc.com)
Thermal Tickets
There are many variables to consider when selecting your ‘stock’ so we suggest you get in touch with one of the suppliers us and they can give you a call to discuss the suitable options for your unique requirements.
In order to provide you with an accurate quotation, we must have the following information.
What size ticket stock, the width can be from 20mm to 82mm, the length can be as long as you want.
Do you require full images front and back (4 color process)?
Do you require security features like holograms, coin rub, Ultra Violet images, special inks.
What quantity do you require?
Here are some additional things to consider prior to getting in touch.

THERMAL TICKET PAPER
Thermal ticket paper usually comes in ‘fanfold’ – the paper is folded in bundles like a fan (such as concert or baseball tickets).
The ticket size is really up to you. Our printers can print up to a width of 82.5mm (or about 3.25”) but you do not need to use paper that width.
The weight of the paper can vary also, just like normal paper you use in photocopiers.
Do you need bespoke designed ticket stock or will a generic template suit your needs?
THERMAL WRISTBANDS
Thermal wristbands come in a variety of different materials: paper and vinyl being the most common. Stimare can even supply waterproof thermal wristbands.
Size, shape and colour are again variables to consider.
THERMAL PRINTERS & THERMAL PAPER
Remember that thermal printing (or direct thermal printing) is a printing process whereby the paper reacts to heat created by a thermal printer (the print head specifically) and produces an image or text.
A thermal printer needs thermal paper to work. Thermal paper is specially produced so that it reacts to heat.
What information should we print on our ticket stock?
We recommend you allow enough space on your ticket stock to print the following information as standard although you can add additional information if needed:
The QR CodeThe Game Name
The Game Date
The Patron Name
The Patron Row and Seat Info
The confirmation number
The Entrance / turnrstile
The Ticket Price
The Booking Fee
The Game Time
Season Cards
Season Cards provide an economical medium to control access into your bookings. Our durable Triplex cards are the perfect wallet size and guaranteed to last your entire season. These cards can be used for access by including seat reservations, account numbers and card holder names.
Perfect For:
Season Admission
Membership Programs
Reloadable Value
Customer Loyalty and Rewards
Features:
We recommend a card size of CR80 (3.375” x 2.125”)
10pt Teslin Core Between 10mil Lamination
Full Color Digital Printing
Round Corners
10pt Teslin Core Between 10mil Lamination
Full Color Digital Printing
Round Corners
Upgrade your Season Cards with your choice of print enhancements:
MVP
Foil
Spot Varnish
Matte or High-Gloss Lamination
Zebra & Motorola Scanners
Configuration Settings
How to set the device to enable automatic scanning of Flowte QR codes
1 | Set the browser home page
In Google Chrome set the following url to be the default home page:
https://www.flowte.me/system/scan.php
This will ensure scanning is ready as soon as you open the browser
https://www.flowte.me/system/scan.php
This will ensure scanning is ready as soon as you open the browser
2 | Device configuration settings
2.1 | From the Home screen select and open 'DWDemo'
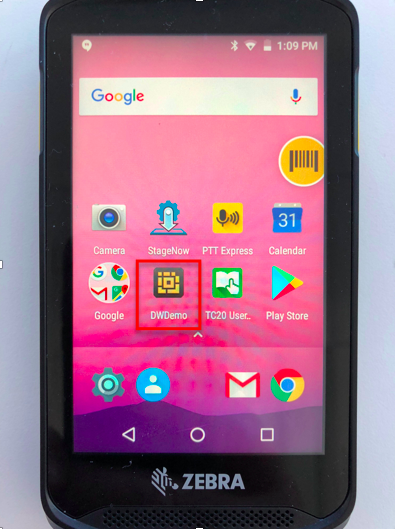
2.2 | Click and open the Settings menu located at bottom right of screen (the 3 dots)
2.3 | In the Settings menu enable the following options:
Barcode input
Enable/disable scanner input: enabled
Scanner Selection
Auto: 2d barcode imager
Decoders
Codabar: enabled
Code 128: enabled
Code 39: enabled
PDF417: enabled
QRcode: enabled
UPCA: enabled
Keystroke Output
Enable/disable keystroke Output: enabled
IP Output
Enable/disable output via IP: enabled
Enable/disable Remote wedge: enabled
3| DataWedge app
Ensure the DataWedge app is open whenever you wish to scan
You are now ready to start scanning tickets!
Card Reader Guides
Europe
Making a Sale
Contactless sale
End of day report
USA & Canada
The Reconciliation process below helps you to reconcile the Flowte system with the transactions on your Chip and pin devices.
Reconciling Card Readers & Flowte
Step 1: Reconciling your chip and pin terminals.
To view batch history
• Select OTHER, then select REPORTS MENU
• Select DETAIL or DISPLAY then select PRINT or DISPLAY
• If prompted, select sort method: REFERENCE #, INVOICE #, or CARD TYPE • The selected information will display
• Press CANCEL to return to the Reports Menu
To view batch totals
• Press the ADMIN key
• Enter password and press ENTER
• Select BATCH MENU
• Select BATCH TOTALS
• The selected information will display
• Press ENTER to return to the Batch Menu
Step 2: Reconciling your Flowte account
Navigate to Analytics > Detail
Use the filters to choose your date range
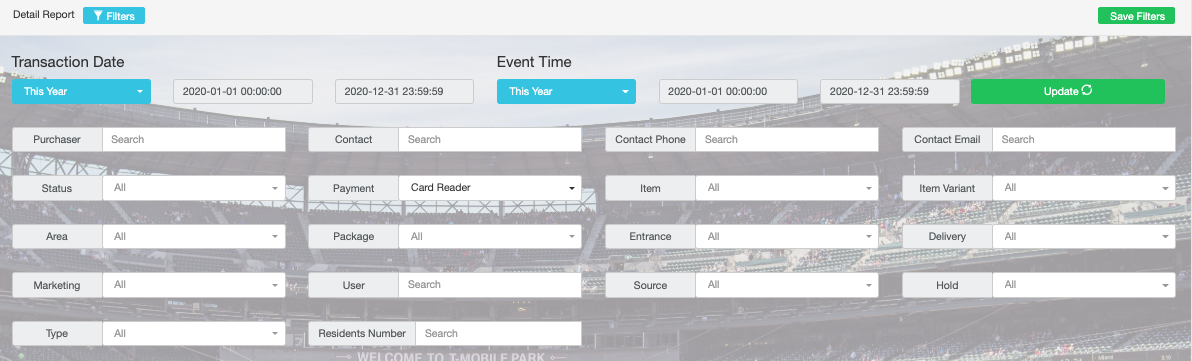
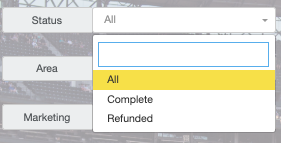
Use the status filter to select whether you want "all' "complete" or "refunded" transaction.
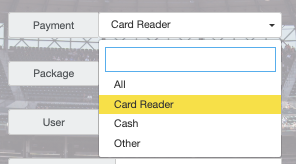
Using the payment filter, select Card Reader
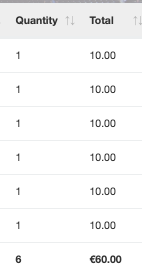
The report will appear showing your ticket quantity and total sales.
Step 3: Reconcile Both
To view batch history
• Select OTHER, then select REPORTS MENU
• Select DETAIL or DISPLAY then select PRINT or DISPLAY
• If prompted, select sort method: REFERENCE #, INVOICE #, or CARD TYPE • The selected information will display
• Press CANCEL to return to the Reports Menu
To view batch totals
• Press the ADMIN key
• Enter password and press ENTER
• Select BATCH MENU
• Select BATCH TOTALS
• The selected information will display
• Press ENTER to return to the Batch Menu
Step 2: Reconciling your Flowte account
Navigate to Analytics > Detail
Use the filters to choose your date range
Use the status filter to select whether you want "all' "complete" or "refunded" transaction.
Using the payment filter, select Card Reader
The report will appear showing your ticket quantity and total sales.
Step 3: Reconcile Both
Make sure the total figures from the chip and pin devices matches that of the Flowte Detail report.