Refund Options
Standard Refund or Reprint (system admins only)
This is a standard refund which will return funds to the original method of payment.
For example, if the transaction was paid by card, this will return funds to card; if this
was a cash transaction, the transaction will be recorded as refunded in the system
and you will need to issue a cash refund of the physical monies.
1. Log in to flowte.me
2. Navigate to Fan Engagement > contacts
3. Search for the contact who needs a refund or reprint
4. Click the Edit button next to the order you wish to refund or preprint
5. Click the green "refund transaction" or "Print Items" should you need to reprint and order
Express Refund or Reprint (available to all agents)
After an order has been completed you can always quickly reprint an order as follows:
1. On Storefront page in bottom right hand side of screen you will see a "last order" information box
2. Click on the "last order" box
3. Click the green "refund transaction" or "print items" as needed
Refund to Other
This feature is used when you are unable to process to a refund to a credit card that has expired. You will need to arrange an alternative method in order for your customers to receive funds via check, cash, etc. By selecting refund to other the transaction is subsequently recorded on your Flowte account. This feature is beneficial to you as you are able to process the refund and report on it also.
Below are steps on how to refund to other.
1. Search for the contact. There are two ways to do so:
a. Search for contact: Navigate to Fan Engagement > Contacts > Select the transaction.
b. Search using the transaction number: Navigate to Fan Engagement > Transaction Search > Input the transaction number.
2. Refund the transaction.
a. In the top right hand corner of the screen select the red "Refund Transaction" button.
b. From the options select Refund to Other.
Refund to Hold
This is used to refund a transaction to the original method of payment (as with the standard 'Refund' option outlined above), however in this instance the seat / seats will simultaneously have a hold applied. This means the seat will not be available for sale online, but will be available for sale via the back office and will show as a different colour on the seatmap. Select the the hold you would like and click Refund
Methods of Payment (MOP)
Flowte accepts a variety of payment options, also making it easier for you to manage your ticket office & record data.
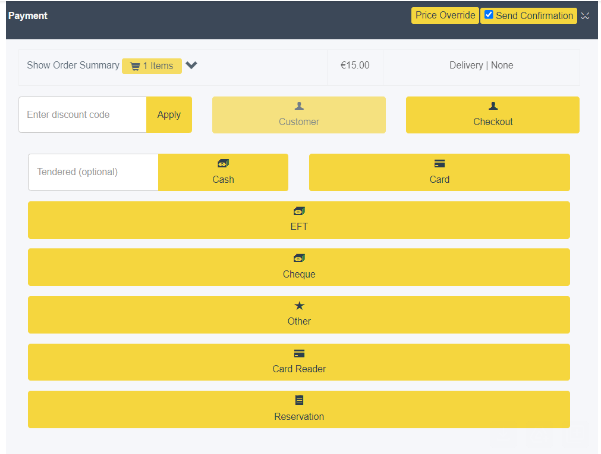
When you click on 'Customer' or 'No Customer' you get the following MOP options.
Cash: For payments made with cash
Card: For payments made with card over the phone
Card Reader: For payments where the customer is present. The card reader is faster & easier then "card"
Other: Used for alternative payment methods. This is commonly used for payment via cheque or bank transfer.
Gift Voucher / Certificate: If your customer has a gift certificate and wants to use this as payment for a storefront order you can process this order via the "other" mop
Custom Payment Methods: Any additional custom payment methods required by a client can be added by request (eg. bank transfer, mobile payment etc)
Price Override
Process the sale as normal until you get to checkout. Select price override in the top right hand corner.
The following page will appear. Here you can:
1. Remove item fees.
2. Remove Transaction fees
3. Update item price. To update item price input the amount you'd like and click the "Update Item Price" button.
Direct Debit Payments
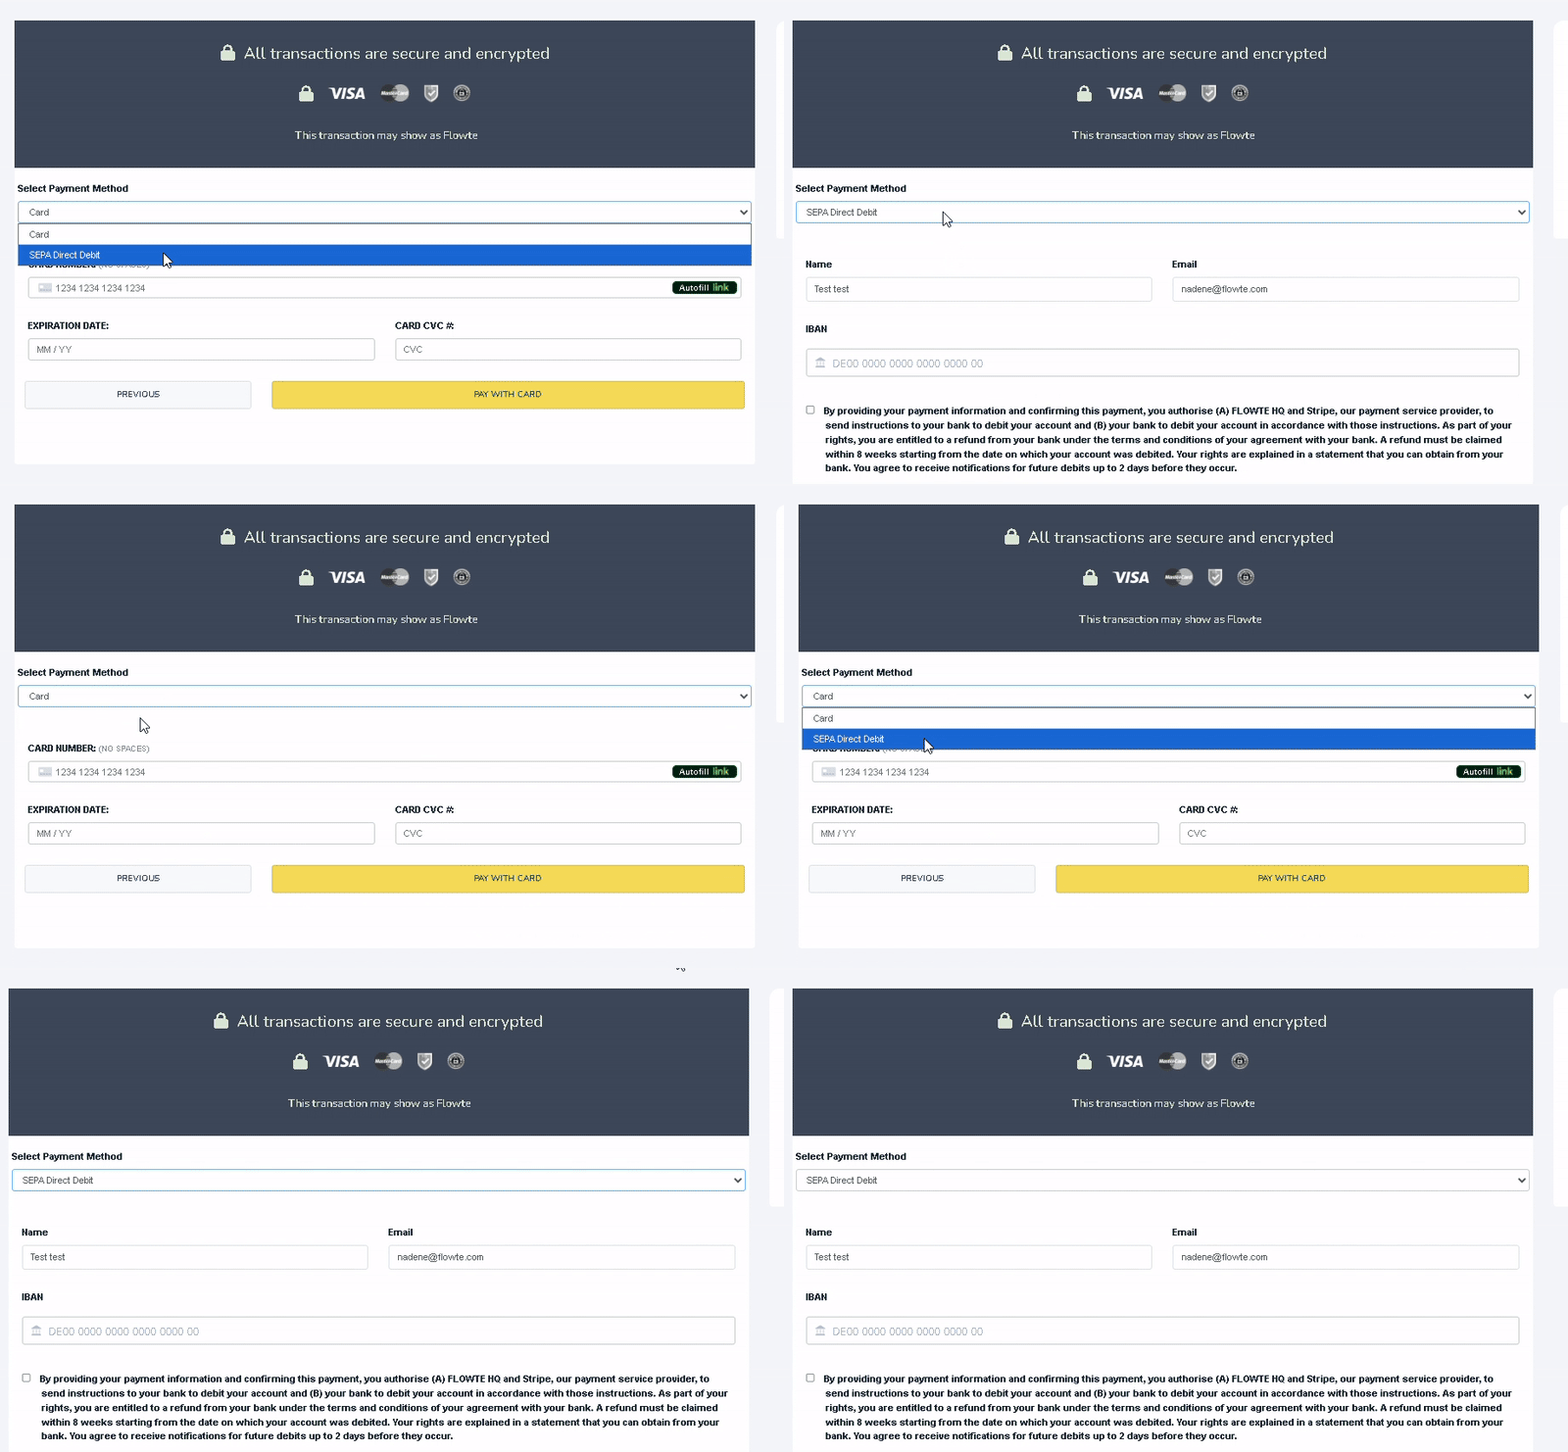
You can now accept payments via Direct Debit, and all funds will settle directly into your connected Stripe account.
Ticket Delivery
Tickets are not sent immediately when a customer pays by Direct Debit. They will only be delivered once the payment has fully cleared in Stripe.
Communication
We recommend adding a short notice on your event pages informing customers that tickets will only be released after the Direct Debit payment has cleared.
Processing Time
Direct Debit payments typically take around 10 days to clear. For this reason, Direct Debit should only be used for events scheduled 10–15 days in advance.
To avoid confusion, please add a note to your event pages stating that Direct Debit should not be used for events happening within 10 days.
Refunds
Refunds cannot be issued while a Direct Debit transaction is still in progress. Refunds can only be processed once the payment has fully cleared.
Activation
If you would like to enable Direct Debit as a payment option on your account, please contact us at
help@flowte.com.
Reservations & Invoices
Reservations are useful for transactions which will be paid in the future with no payment taken at point of purchase
NB: If you untick "Send Email Confirmation" customers will not receive tickets until final payment is made.
Reservation Links
This feature will allow you to take payment for a reservation or send a link to your customers for them to pay themselves.
The 'Pay Reservation' button can be found on the transaction page, and you can also update your reservation email template to include a link for customers to pay for their reservation online without having to contact the ticket office directly.
To set this up, add the following code to your reservation email template: <a href=“[payment_url]“>Pay Reservation</a>
Creating Invoices.
If you need to send an invoice to customers whose tickets are reserved you can design an invoice for them by navigating to Ticketing > Tickets > Add Confirmation Email. Here you can deign and save your invoice template.
To activate the invoice template navigate to Admin > Settings > Reserved Email Eemplate. Here you can choose your template and then click "save storefront settings" Once a reservation template has been applied this will be automatically sent to your customers anytime you select reservation as the method of payment when taking storefront orders.
Processing a reservation / invoice order
1. Select 'Customer' > This will link the resevation to the contact'. It will also show as a reservations in your reports.
2. Select the "Reservations" MOP.
3. When the customer is ready to pay > Search for contact or transaction:
4. Navigate to Fan Engagement > Contacts > Select the transaction or use the transaction search app
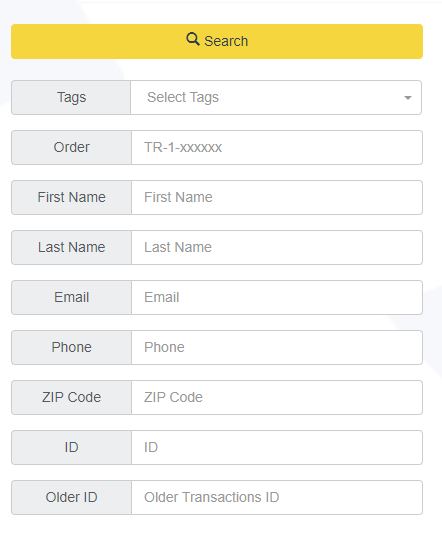

5. In the top right hand corner select Pay Reservation.
6. This will bring you to the payment window. Here you can complete the payment process for this transaction.
7. This process can also be followed through the reservation link found in your confirmation email.
Invoices for Deal Pipeline
The invoice feature within Deal Pipeline allows you to take payments for hospitality bookings, sponsorship deals, etc. For further details, select any Deal by clicking the title.
Exchanges
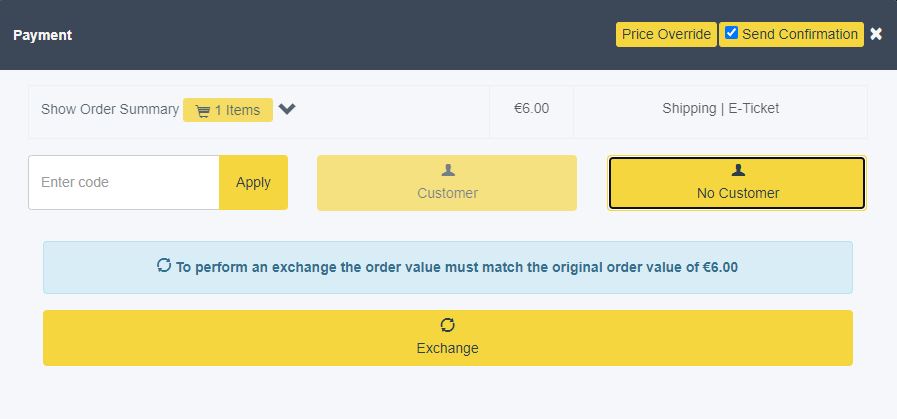
If a customer wants to exchange their ticket you can easily do so with the exchange feature. This feature is beneficial to you and your customers because you are able to exchange a ticket for another one in your organisation. To perform an exchange the order value must match the original order value.
1. Navigate to Fan Engagement > Contacts > Search for the contact that requires the exchange.
2. Using the transaction table, select the transaction you want to exchange.
3. On the transaction page in the top right hand corner you have a blue "Exchange Transaction" button. Select Exchange Transaction.
4. You will then be brought to the storefront where you can purchase a new ticket. Make sure the order value matches the original order value.
5. Select finalise and your exchange is complete.
Gift Cards / Vouchers / Certificates
If a customer wants to use a gift card to pay for their order Flowte accept 3rd party gift cards or Flowte Gift Vouchers
To apply a gift voucher payment against an order follow the steps below as shown in the image which shows a €20 voucher
being applied against a €40 order.
Step 1: Click Price Override
Step 2: In the price box deduct the voucher amount
Step 3: Enter the voucher number in the order note / voucher number input box (as shown above)
Step 4: Click "Update Item Price"
Step 5: Finish the order as normal
Confirmation Email Schema
Follow these thirds party guides to customise your confirmation emails for optimal performance with email clients:
These generally apply through Google, Outlook etc as a basic standard.
Google event email markup:
Card Processing Charges Explained
Wherever you’re selling, credit and debit card transactions probably account for a large chunk of your payments. So it’s important to understand how you’re being charged. This article will walk you through the components that make up your card processing fees and then deep-dive into the part that accounts for the highest proportion: Interchange.
Credit card processing comes with three fees:
Processing fee: Charged by your payment provider for processing the transaction
Card scheme fee: Charged by the card schemes for using their network
Interchange fee: Charged by the customer’s bank
When it comes to interchange, there are ways to bring your costs down.
These fees vary depending on the type of transaction, your location, and business model (to name but a few). It’s confusing, but it can have a significant impact on your bottom line. The good news is, when it comes to interchange fees, there are ways to bring your costs down. But that’s only the case if you’re billed in a way that tracks the interchange rates (this is called Interchange++ - more on that later).
What are interchange fees?
Interchange fees are agreed by card schemes (Visa/Mastercard/Amex etc.) but are paid to the issuing bank (or customer’s bank). They're usually the biggest expense when it comes to card processing. They're also the biggest headache. The structure and fees vary for each market, as do types of cards (consumer debit, commercial debit, pre-paid and so on). And they change all the time.
Traditionally, there was very little transparency into how these fees were calculated. Large businesses with a high volume of transactions could negotiate lower fees, while smaller businesses were forced to pay the full amount. Markets dominated by the large international card schemes were most vulnerable because businesses could hardly refuse to accept the payment methods used by the majority of their customers.
Fortunately, in recent years, efforts have been made to standardise interchange with stricter rules, the introduction of fee caps, and an overall improvement in transparency.
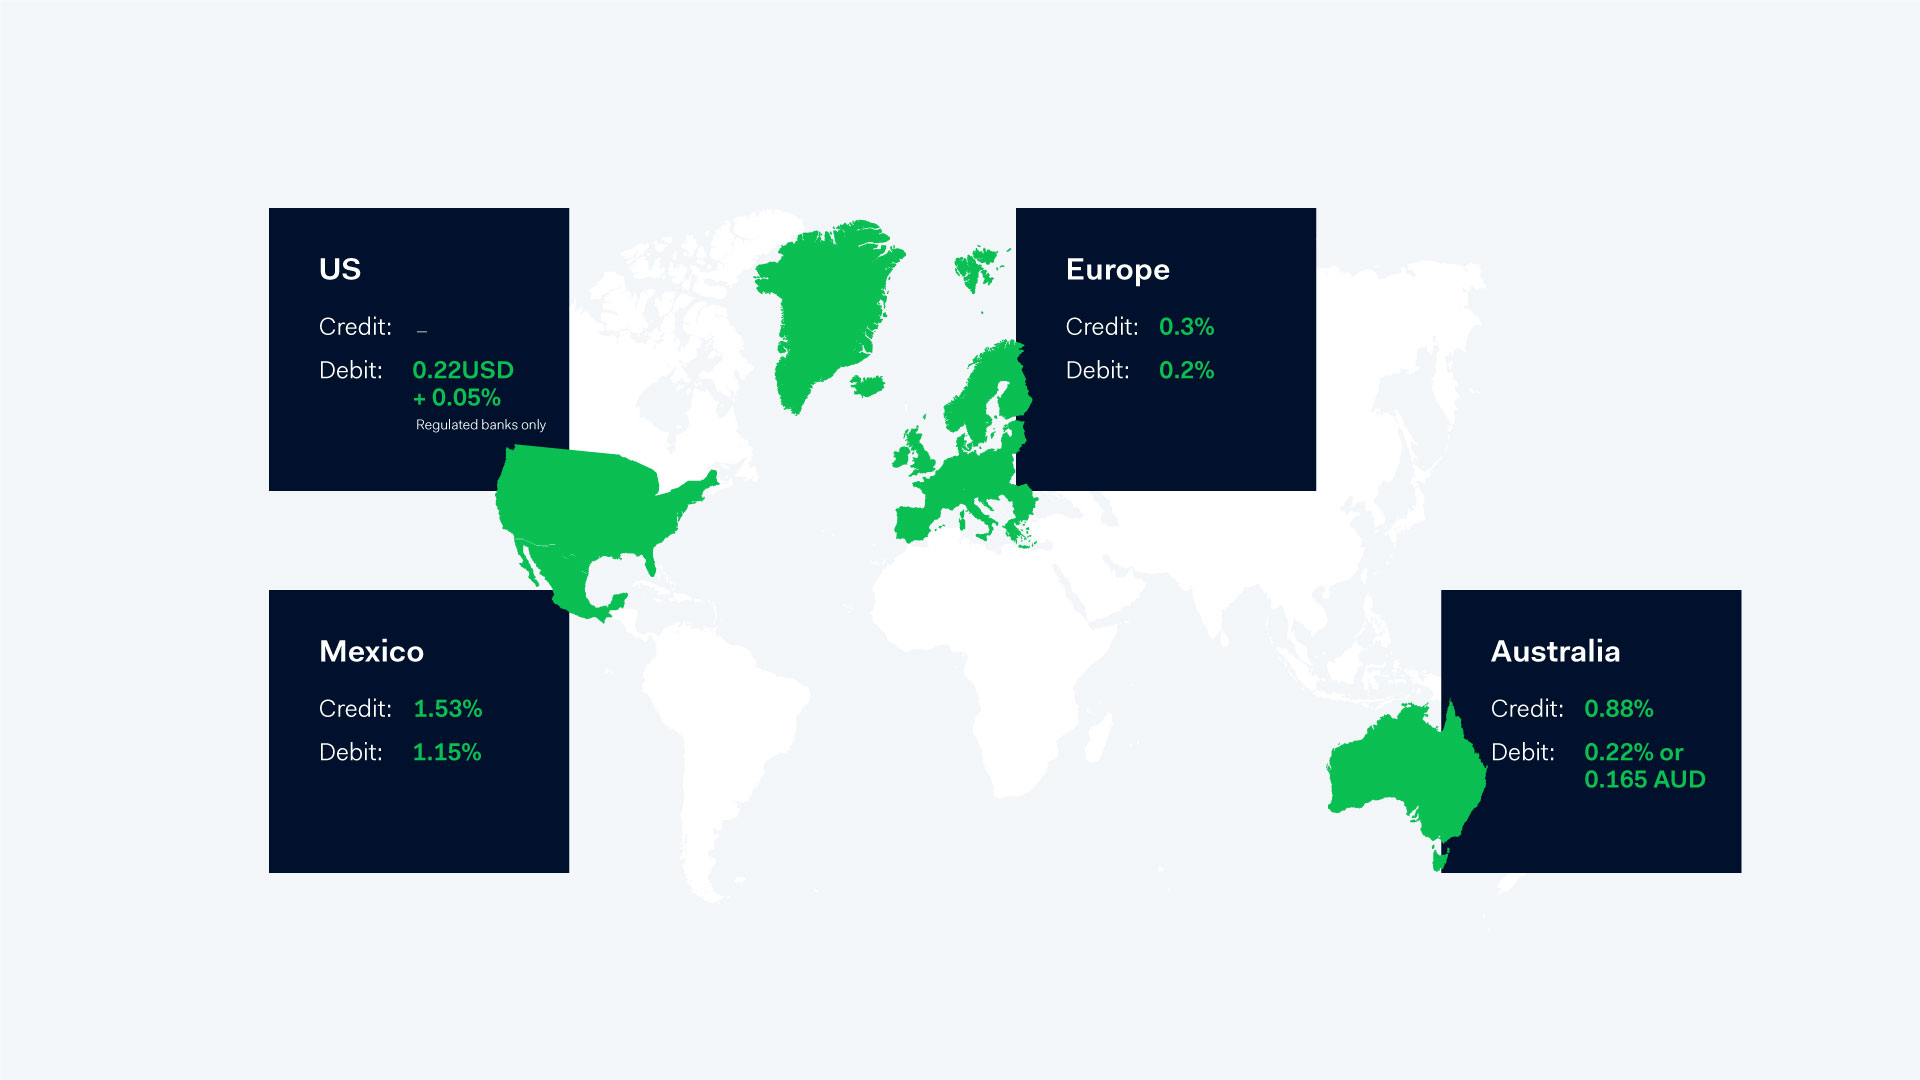
Below is a break-down of the fees caps across different regions:
Note: US credit is unregulated and US debit applies to regulated banks only. Fee caps only apply to consumer cards in the US and EU. And, in Mexico, caps depend on industry and some rates are negotiable.
What impacts how much you pay?
Drivers that impact interchange fees include: region, sales channel, card type, and business model. Understanding these factors allows you to optimise the process and get the best rates. Here are some examples:
It’s better to use a local acquirer where possible.
Local acquiring. Just like mobile roaming fees, transactions are generally cheaper if processed locally. So, it’s better to use a local acquirer where possible because this is the only way to benefit from local regulations and incentivised fees.
Learn more about local acquiring
Interchange++: the transparent billing structure
Interchange++ is a pricing model that tracks the interchange rates. For example, the fees cap across Europe has been a huge benefit for businesses billed with Interchange++ because when interchange goes down the saving is passed to you. To quote the Interchange Fee Regulation: "The outcome the European Commission expects is that merchants should know, for each transaction, the amount of the [Merchant Service Charge] and the interchange fee and are therefore able to check if the benefit of the regulation has been passed to them." You can read the full article here.
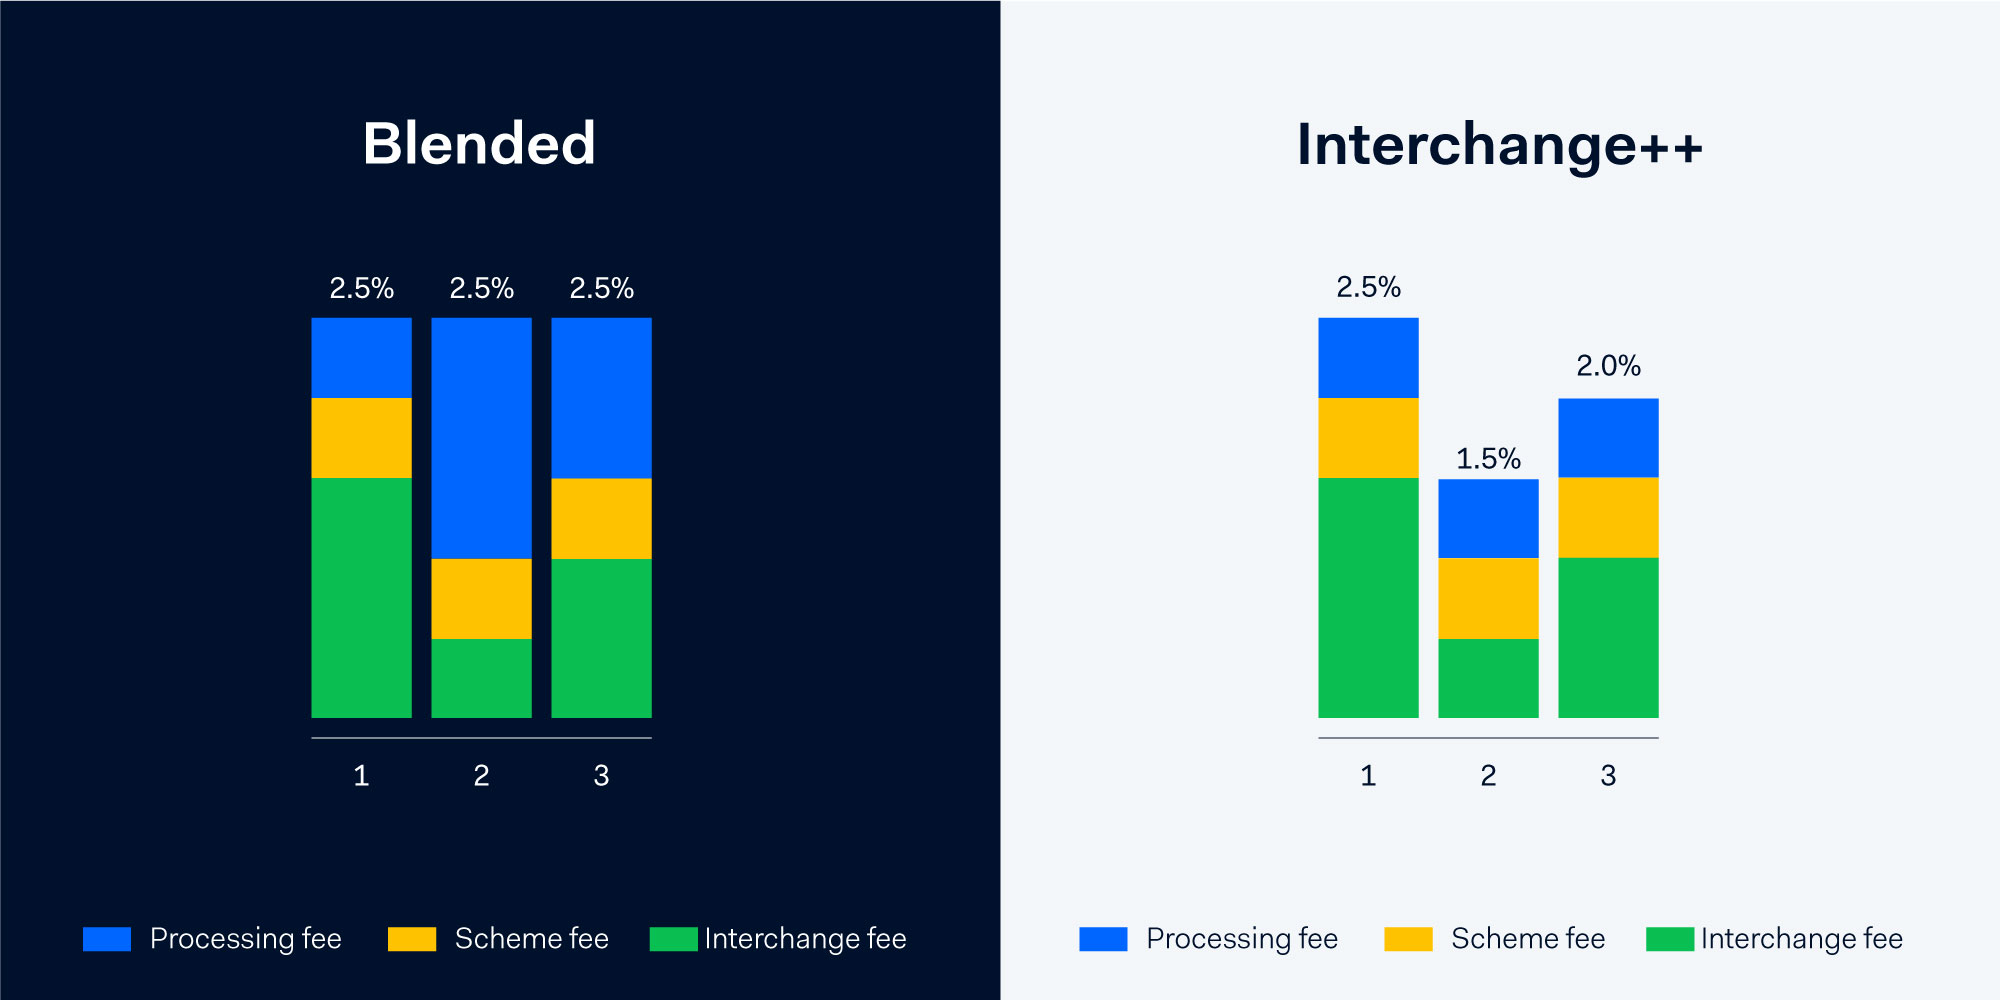
The alternative to Interchange++ is blended pricing as offered by companies like Stripe and Paypal. Blended charges an average processing cost plus a fixed markup. You’re charged the same price for every transaction, which makes it easy to understand but it’s not transparent. You can’t see what you’re being charged for and there’s no guarantee your processor will pass on any savings.
Blended vs Interchange++ pricing: When interchange goes down, your costs go down
You get to see exactly what you’re charged for every transaction so there’s no danger of hidden costs.
Incentivised rates
Interchange fees vary from market to market. In the US and Australia, for example, Visa and Mastercard grant lower rates to specific businesses like charities, travel agents, streaming services, and utilities. Again, you only benefit from this saving if you are billed using Interchange++.
We worry about interchange for you
You have better things to do with your time than track ever-changing interchange rates and regulations. So we do it for you.
We’ll keep you informed about any changes that will affect you. Our dedicated team monitors rates and regulations to ensure you get the best deal. Plus, our local acquiring licenses in key markets around the world give you access to lower domestic rates.
Card processing transparency
Transparency is central to everything we do at Flowte, which is why you are always billed using Interchange++. You see exactly what you’re being charged and any savings we make for you are passed on at no extra cost.
We hope this has been helpful and cleared up any questions or confusion around interchange fees. Don’t hesitate to get in touch if you'd like to know more - we always love hearing from you.
Navigate to Settings
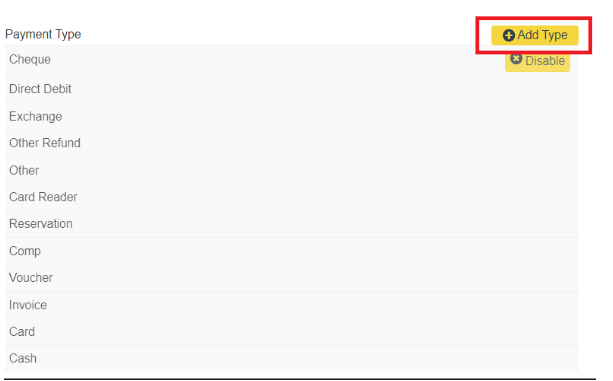
Go to Admin > Preferences > Settings and click on Add Payment Method.

Add a New Payment Type
Once the payment method screen opens, click on Add Type.
Name and Save
Enter the name of your new payment method, then click Save.

Your custom payment method is now available for use in transactions.
Reporting:
Custom payment methods are fully integrated into the system's reporting functionality. You’ll be able to track and view transactions made with the new method in your reports.

This feature is particularly useful for adding non-standard payment methods like Electronic Funds Transfer (EFT) or cheque, allowing for greater flexibility in payment options for your clients.
