3 | Locations
Seatmaps & Location Introduction
- Location(s) and seat-map(s) are the building blocks of the Flowte platform
- You must add a location before adding bookings, products or other items for sale.
- There are two main types of location; seated location & non-seated location
- Seated Locations allow the customer can choose their own seat from a seat-map e.g. stadiums
- Non Seated Locations offer the customer unallocated access, e.g. a conference or a GA concert
- Navigate to Ticketing > Location
- Enter Location name and address.
- Add all the required "areas" in your Location, e.g. 'General Admission' or 'VIP'.
- When adding bookings, you can set tickets for each area. To add an booking, click here: Creating New Bookings
- Click "Add Seated Location".
- Select the location type that suits best: "without sections" or "with sections" per image below.

- Locations with sections allow you to draw each section & then fill it with bookable objects.
- Use the section tool to draw a section (either as a polygon or a rectangle):
- Go to section mode, either by double-clicking the section you just drew.
- You will see a large version of your section with all the tools to draw bookable objects within this section:
- When you're done, click the "Exit Section" button (top left) to go back to your sections overview.
- For locations with rounded or arching section boundaries > Use Flowte's designer tool
- When drawing a Section create multiple points across the curvature or rounded border you wish to create
- Wide angles will have a curve applied to them to smoothen them out.
- Once done drawing, you can adjust the smoothing of the section by adjusting the Smoothing slider.
- While drawing, if you make a mistake > right click to remove the last node you laid down.
- You can learn more by looking at the status bar at the bottom of the screen while on the Section tool.
- Hold the alt key while drawing to disable snapping to other points, or deselect Snap to grid
- Turn Snap to grid back on after you are done. This will make it easy to lay down rows symmetrically
- If your section needs smoothing > use the Node tool to click on the any sides that need additional nodes.
- Using a Reference chart to draw on top of is the most effective way to draw a precise seating chart.
- Drag an image to the Reference chart property, visible when no object is selected
- Create a Seated map containing all seated sections and a GA map that has all GA sections.
- Create a new booking using the Seated map and define all settings for those sections.
- When created > go to booking info page and click the "new time" button.
- Once your mixed location has been created you now need to optimise the purchase flow
- Navigate to Ticketing > Bookings > Booking Info > Set the selection text to "Select Area / Section" or similar
- Navigate to Ticketing > Bookings > Booking Info > Set the select type option to "Buttons".
- Navigate to Ticketing > Bookings > Booking Info > View / Edit times and prices > select your GA booking.
- Set the "Custom" name for each item on the table to "Standing" or similar for your booking.
- Navigate to Ticketing > Bookings > Booking Info > View / Edit times and prices > select your seated booking.
- Set the "Custom name" to " Seated" or whatever similar naming makes sense for your booking.
- Now when a customer clicks on the booking you created, they will be offered the different Custom names
- To help your customers find their section they online adding an image is helpful
- Your map should sets one colour for all seated sections and a different one for GA sections (shown above)
- Take a picture of the map, this will be the guide for your customers.
- On the section name, indicate which colour is for seated and which for GA standing
- Make sure they are set to "buttons" option type.
- To display the map to the left of the section:
- Upload the image to https://imggmi.com/, untick "Image resize" and click "Upload Now".
- One uploaded, there is a link called "1. Viewer links": Make sure to take note of this!
- Go to Ticketing >Bookings > select the booking.
- In the description, click on "Source" and paste the following code:
- <img src="IMAGE_URL" style="height:auto !important; width:100% !important"/>
- Replace IMAGE_URL with the link from step 'a' in the description code.
- Click "Save" for the event. This image will now display as shown in the example above.
- 3D Maps. Create a seating chart with multiple floors
- Section-based charts can have subsequent floors created after the first one is drawn.
- In order to create a new floor:
- Create a new section-based chart, or load an existing section-based chart.
- Start drawing the first floor.
- Once you are done, click the + (plus) button on the floor picker (shown below), to add a new floor.
- As you begin drawing on a new floor, the + (plus) button will show again, all the way up to nine floors.
- Converting existing charts to multiple floors
- It is possible to convert an existing floor plan where each floor is a separate section
- Simply add a floor, then copy/paste the relevant section into that floor, and delete it from the initial floor
- You may need to readjust the sections/floors to ensure a good end user view
- You can check this by clicking on the Preview button at the top left of the designer.
- Once you have created your location, you can edit it via the blue Edit button.
- However, locations cannot be edited once a booking has been associated with it
- In this case you should make a copy of the location using the copy button (shown below)
- Edit the copy.
- Replace the old location with it's edited copy in your booking.
- Deactivate the old location.

Rulesets
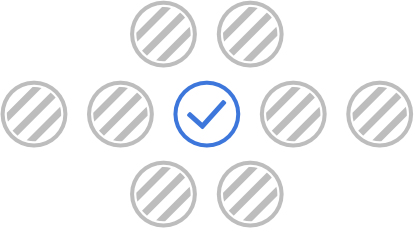
The ultimate social distancing solution: Real time seat picking, with venue occupancy optimization.
Build trust
By indicating that seats near a booking won't be sold to others, you build trust with returning patrons, local regulators and your booking promotor.
Set the rules
Create social distancing rulesets, test them on the playground, and apply them to your bookings
Update rulesets on the go as social distancing regulations change. No coding required.
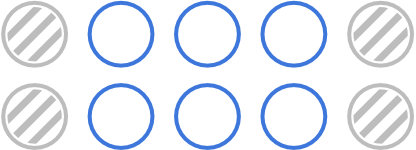
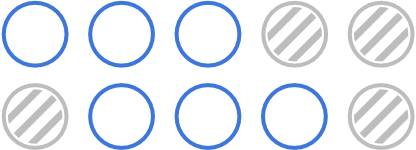
Determine how many seats to be left open to the sides as well as front and back.
Limit group bookings
Allow family members to seat together by increasing the limit of seats that can be selected together.

Maximum occupancy
The floor plan prevents the ticket buyer from selecting seats in a sub-optimal layout, thereby ensuring that rows are filled up as much as possible, while procuring social distancing.