2 | Users & Settings
Adding Users and Roles
Adding a New Role
Navigate to Admin > Settings > Users & Roles
1. Input your role name e.g. "Admin", "Marketing", "Accountant".
2. Determine the applications they will have access to. Click confirm.
3. Determine the functionality the role will have. Click confirm.
4. Click "Add" button.
Adding New Users
Navigate to Admin > Settings > Users & Roles
Here you can create a new user for your organisation:
1. Select the Add User button in the top left hand side of the page. The following will appear.
2. Set the first, last name and job title of the new user.
3. For the email, it must be unique so it is best to use a longer name.
4. Select the role of the new user.
Editing Users Roles and Details
Navigate to Admin > Settings > Users & Roles > View the Exisiting Roles section
1. Click the view users blue button next to the role of the user you wish to edit
2. Click Edit User in the pop up box which appears for the user you wish to edit
3. Per the image below change the users role in the drop down menu for role and click save
Promoter role
Implementing a promoter user role to restrict access to specific events or products upon login:
Navigate to Admin >preferences>settings>user and roles
Select either products/bookings
Navigate to Admin >preferences>settings>user and roles
Create a name for the new role, which could be the promoter's name. Then, choose the specific access permissions: opt for "Promoters Reports" if you want them
to view reports only for their event, and select the "Storefront" option if you want them to access the storefront of the chosen event.
Additional functionalities include deciding whether the promoter should be able to process refunds, and if they should have access to price override and ticket password.
Once the selections are made, click the "Add" button to save the new role.
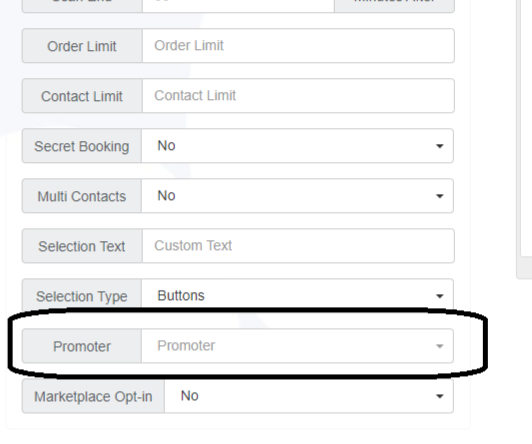
Add your promoter to the event/product:
Storefront>E-Commerce
Select either products/bookings
Choose your promoter from the dropdown list to grant them exclusive access to the designated event/product upon logging into Flowte.
Adding a promoter to have access to a bundle:
1.Follow the steps for creating a new role for your promoters.
2.During the bundle creation process, select the promoter you want to assign to the bundle. Note: Promoters must be assigned during the bundle creation.
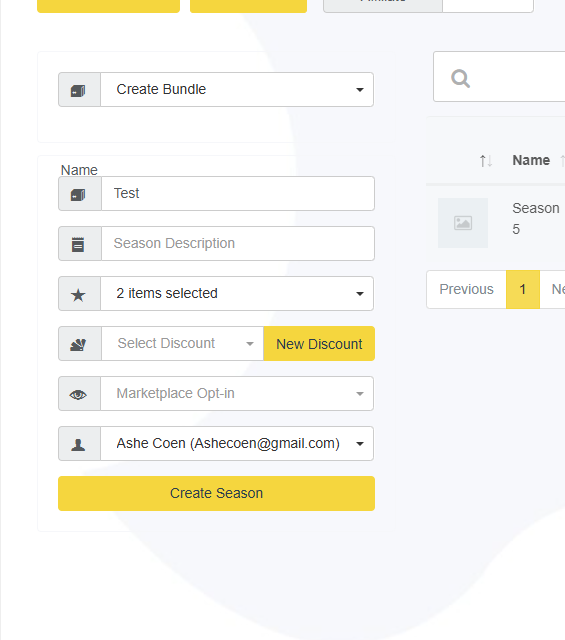
3.Once assigned, the promoter will have access to the bundles, along with any bookings or products they’ve been granted access to.
User Account
Your user account is how you access the system and allows you to customise some settings:
Settings
Navigate to Admin > Profile
You can change the following settings:
- First Name
- Last Name
- Email
- Password
- Default Venue (if you have more than one venue in your organisation)
- Timezone
- Your user image (click on the image to upload the new photo)
Reset Password
In a situation where you are unable to log in due to forgetting your password you can regain access by doing the following:
2. Click on "Lost Password"
3. Fill in the email address you use to log in
4. If it is an @ flowte.com email address, contact support to validate the reset. If it is an email address you have access to, you will receive an email soon after you submit the request.
5. Once you get the email, click on the link to reset your password. You will now have the ability to set a new password and log in
Data Import
Navigate to Admin > Settings > Data Import
Here you can import contact, barcode & transaction databases with ease.
N.B. Please adhere to the 4mb max file size! Divide up larger files & import them in 4mb sized segments if neccessary.
N.B. Please adhere to the 4mb max file size! Divide up larger files & import them in 4mb sized segments if neccessary.
Account Settings
Navigate to Admin > Settings > Account Settings
Account tab
If you make any changes in the Account page remember to confirm them by using the 'Save Account Settings' button on the top left of your screen.
Location
- Location Name - This is your organisations name.
- Country - The country you are located.
- Timezone - Your timezone, set this carefully as it can affect your Booking times (DST etc)
These settings can also be changed in Admin > Profile
Images
Fan Engagement > Website

Fan Engagement > Website
- Upload Logo - Upload your organisations logo here. Recommended format is .jpg or .png. Use .png if you require transparency.
- Background Image - This is the background image used in Flowte. It is recommended that the image is landscape in profile and at least the same resolution of the screen you will be using.
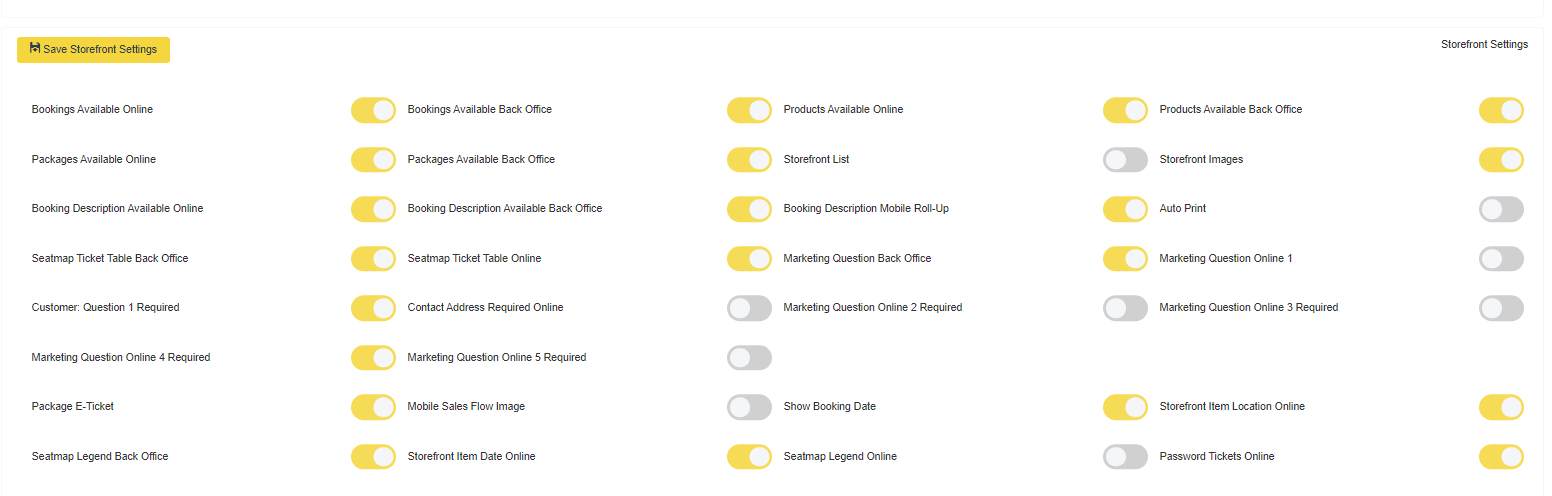
Storefront tab
If you make any changes in the Storefront page remember to confirm them by using the 'Save Storefront Settings' button on the top right of your screen.
Toggle the settings right to activate and left to de-activate
Required Fields
Using this dropdown menu you can select which fields in the online and back office purchasing flow will be required from the customer.
The items you check as 'required' will need to be input before the customer / back office operator can progress in the sales flow.
Online
- First Name
- Last Name
- Phone Number
- Company
Back Office
- First Name
- Last Name
- Phone Number
Templates
All templates are managed and created in Fan Engagement > Templates
From here you can select the templates you want to use as well as how you want your back office, online and mobile sales flow to appear.
Enhanced Privacy Questions
Navigate to Admin > Settings > Enhanced Privacy Questions.
These questions are customizable to whatever your requirements may be. As the example above shows, it can range anywhere from marketing preferences to covid protocol compliance.
At the top of the Settings page you will find the corresponding buttons needed to set your questions to Yes (Required) or No (Optional). Each question can be individually set to allow for whichever configuration suits you best.
Below is an example of the questions displayed to customers during the booking process, these questions can be agreed to by clicking the blue tick on the left. The customer's response will then be saved to their contact record.
.
These opt-in are highly customizable, allowing for unique configuration based on each venues individual requirements.
For example, a customer could choose to receive marketing from only one of your multiple venues if desired. They may also prefer to receive marketing only by email & not by post. These are but a few examples of the many preferences which can be defined using the Enhanced Privacy Questions. You will be able to set up to three types of questions per venue for your customers.
Policies & Terms of Service
Refund Policy, Privacy Policy, and Terms of Service - Type your various policies in these boxes and click 'Save Storefront Settings' to confirm. These policies will be displayed as links underneath the Storefront Cart.
Customer Question - This question will be displayed when the user is asked for their contact information.
Custom Marketing Questions
You have the ability to customise the marketing opt-in question which is shown during the online sales flow. You may tailor this question to suit your audience however you wish. If you do not enter a custom question the default question will be used.
Your question will be displayed to your patrons as below.
Meta tags and Meta descriptions
With this enhancement, you now have the ability to include Metadata Keywords and a Metadata description tailored to any organization's unique identity.
Admin>settings
Once configured, when the link is shared on social media and other platforms, clients will now have the pleasure of retaining their brand identity, with the organization's logo prominently displayed alongside the customized description and keywords.
Website tab
If you make any changes in the Website section remember to confirm them by using the 'Save Website Settings' button on the top right of the section.
- Header Height - This is the header bar at the top of your online storefront. Choose the height, measured in pixels, that suits your needs.
- Header Colour - The colour of the header bar in your online storefront. You can change this using the included colour selector or input your own hex colour value.
- Font Type - Choose the font you would like to use here.
- Cart Button Size - Choose the size you would like the cart button to be online. Default = Large. Useful if you have made a narrow header and want the cart button to look in proportion.
- Font Colour - The colour of the font used in the headings in the storefront.
- Background Colour - Background colour for the storefront.
- Item Button Colour - This is the colour of the buttons used to select your Products, Bookings, Services, etc.
- Item Button Secondary Colour - This is the 'on hover' colour of the buttons. I.E. When you move your mouse over a button it will changer from 'Item Button Colour' to 'Item Button Secondary Colour'
- Cart Button Colour - The colour of the Cart Button.
- Cart Button Secondary Colour - This is the 'on hover' colour for the Cart button.
- Logo Redirect URL - If a user was to click your organisations logo at the top left of the Online Storefront they would be taken to the web address you put in here.
- Show Background Image Online - Yes = Use the background image you set above for Flowte as the background image for your online storefront.
Integrations tab
If you make any changes in the Integrations section remember to confirm them by using pressing save underneath each integration
PCA predict api key
Using the PCA Predict service you can enable automatic address completion and validation across the Flowte system, online and back office. To read more about setting up your PCA Predict account navigate to Admin > Settings > PCA Predict Setup Guide.
Google Analytics ID
Insert your Google Analytics ID in this section for Analytics integration. This will enable you to track and report on your website traffic.
Google Adwords
For conversation tracking and Google AdWords campaign management, insert your conversion id, label and image URL's in this section and click Save Integration Settings
Top 5 User Errors
If you are experiencing performance issues, there are a number of common local issues which should always be checked and ruled out before contacting support as follows:
1. Is you internet connection stable, working and no n congested.
2. Have all your Computers been removed from the local network and local firewall
3. Are your computers running Google Chrome to access Flowte
4. Have you cleared the cache of the browser 5. Allow Pop Ups:
5. Have you allowed pop ups? To do this in Google Chrome Chrome Click >Settings> advanced settings >in the "Privacy" section> Content settings> In the "Pop-ups" section, select "Allow all sites to show pop-ups."
6. You cannot access Flowte back office and Flowte online sales via different tabs in the same browser. This will cause caching issues. To remedy this please clear your browser cache
Flowte Cache Clearing Configuration
In order to troubleshoot and resolve common local issues, a full cache clean is an essential step before contacting support. To ensure a full and effective cache clean, we recommend using the following tool:
Below are instructions on how to clear cache using the Auto Clear Browsing Data Tool and also manually:
Clearing Cache Using Auto Clear Browsing Data tool:
1. Follow the link above to the Google Chrome extension and click 'Add To Chrome' to install. Once installed, it will appear in the top right corner of your Google Chrome browser, under the Extensions icon.
2. Click on add task button
3. Enter task identifier.
4. Select time interval between removal of data - we suggest a twice per day interval.
5. Select data type set to be removed; Websites' appcaches, the browser's cache, and cache storage.
6. Click on add button.
7. Click on apply changes and reload button to start executing the task.
8. See the booking log to verify if the task is properly executing.
Clearing Cache Manually:
- On your computer, open Chrome.
- At the top right, click More .
- Click More tools. Clear browsing data.
- At the top, choose a time range. To delete everything, select "All time"
- Next to "Cookies and other site data" and "Cached images and files," check the boxes.
- Click Clear data.